
We all use AWS Lambda, either at work to automate some workloads, or unconsciously on our daily lives, using our favorite apps and services.
When it was introduced by AWS in 2014, Lambda marked a turning point in the way we develop and deploy our applications and services, making it easier than ever : simply upload your micro-service code, and let AWS handle the rest (compute resources, scaling, availability, and maintenance).
This new paradigm, later known as serverless computing, then became a foundation for modern cloud-native architectures by introducing the FaaS (function-as-a-service) model.
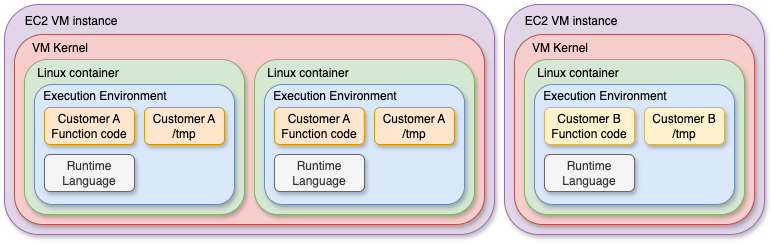
Lambda’s initial infrastructure was relying on container-like sandboxing mechanisms : each customer was using AWS-managed EC2 instances (virtual machines), on which the Lambda functions were running on containers. While being really fast and easy to manage for single-tenant use-cases, this kind of architecture had important limitations in terms of security isolation and resource control (we’ll see later in this post) needed in a multi-tenant cloud environment serving thousands of customers using common compute infrastructure.
That’s where Firecracker comes in.
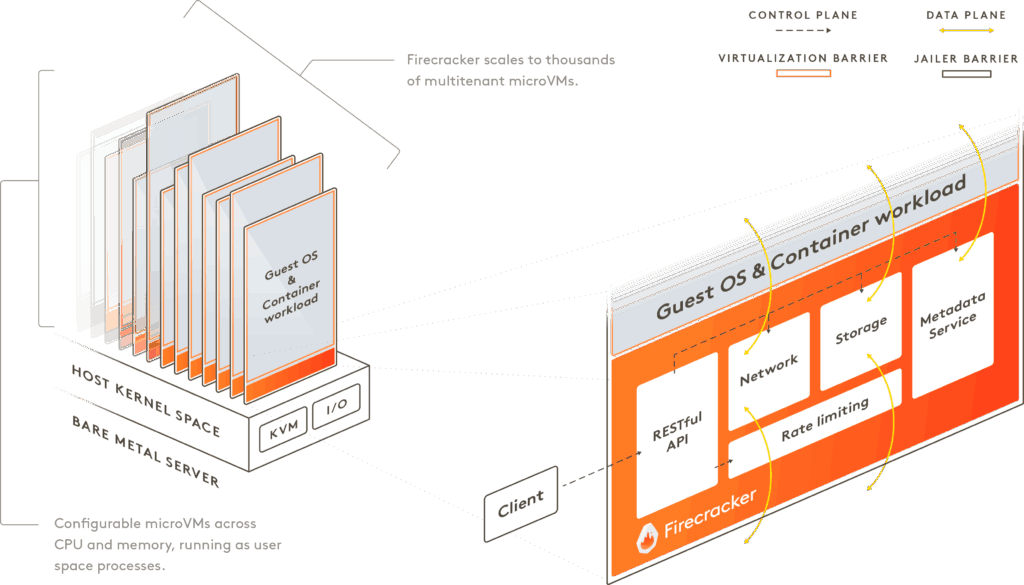
Launched by AWS in 2018, Firecracker is a micro-VM Manager (VMM) based on KVM and built specifically for serverless workloads. It introduces a new kind of virtual machine (micro-VM) that combines the security and isolation of traditional VMs, while providing the speed and efficiency of containers.
Today, AWS Lambda runs each function inside its own Firecracker micro-VM, which spins up in as little as 125 milliseconds (!!!!) and provides a minimal virtualized kernel, tightly tailored to the function’s runtime (NodeJS, Python, Java, .NET…). This architecture ensures that workloads are strongly isolated, even when multiple tenants share the same physical hardware, while maintaining cold start times that are still really competitive with containers.
In this article, I’ll explore the technical internals of Firecracker with some demos, explain how AWS integrates it into its different services (and mainly Lambda), and how it compares to traditional containers and virtual machines (both in terms of performance and isolation).
Containers VS MicroVM : performance & security
While containers are the essence of micro-services and are more easier to use than ever thanks to the many runtimes and orchestrators available, the technology they are based on has some lacks that make it dangerous for multi-tenant scenarios.
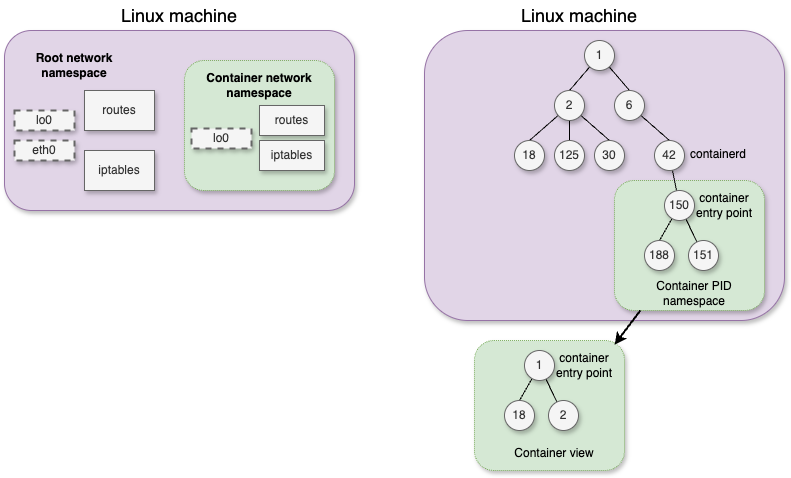
At the base of Linux containers, we have cgroups (or control groups), which permits to define what the isolated processes are able to do, and namespaces, which permits to define what those processes are able to see.
Moreover, chroot permits to change the root directory of the calling process, while seccomp-bpf can eventually be used to control and limit system calls allowed from containerized processes. It goes with an incredibly complex configuration (very hard to maintain, prone to errors), and at the cost of breaking code which requires the restricted system calls.
I plan to write a more detailed post about those features that you all use for years without sometimes realizing their power, but for now, let’s just consider that namespacing permits to “trick” the containerized processes by making them think they are alone in the system (PID namespace) and hiding all other processes running on the host system, provide those processes an isolated routing table (network namespace), or have their own mounted file systems (mount namespace). Other kind of namespaces exist (user, IPC, UTS), but we’ll not dig into that for now.
On the other hand, cgroups permits to limit what the containerized processes are able to do, by providing limited compute (CPU cycles), memory usage, priorization for I/O access, etc.
Even if those mechanisms works quite well to isolate workloads, they still have a major flaw for multi-tenancy : all the containerized processes still share the same kernel, and the associated kernel shared memory. Not only it can cause potential stability issues, but it can also open the door to security concerns and resource interference between tenants – also often called the “noisy neighbor” problem.
Security and performance implications of a shared kernel
Because all containers share the same kernel, any vulnerability in that kernel becomes a shared risk surface.
Any kernel vulnerability can become a a breakout vector, which means that a compromised (or malicious) container could potentially :
- Escape its sandbox, and access ressource or data from other containers
- Exploit shared kernel interfaces, such as system calls or file descriptors, to elevate privileges
- Cause a denial of service (DoS), by exhausting shared kernel data structures
There are several known (and not so old) security threats on the Linux kernel which led to container security issues.
- Dirty COW (CVE-2016-5195) : A race-condition in the kernel “copy-on-write” mechanism (which permits to share virtual memory pages across processes, and creating a copy only if one of the processes tries to write into it. This vulnerability allowed processes to write data on read-only pages (not creating a copy), which eventually allowed containers to write on memory pages of processes isolated on another container
- Container Escape via RunC (CVE-2019-5736) : A vulnerability in the runc runtime (used by Docker and many other container managers) allowed its own binary to be replaced by a container. Which could led to a severe security risk, as it allowed a container to modify the runtime managing all other containers on the host
- Kernel-stack access via /proc VFS (CVE-2018-17972) : An issue was discovered in the proc_pid_stack function in fs/proc/base.c in the Linux kernel through 4.18.11. It does not ensure that only root may inspect the kernel stack of an arbitrary task : a given process might be able to get the kernel stack (task-related informations) for other processes running on the system
- Kernel memory access because of timer_create() syscall wrong implementation (CVE-2017-18344) : kernel/time/posix-timers.c in the Linux kernel before 4.14.8 doesn’t properly validate the sigevent->sigev_notify field, which leads to out-of-bounds access in the show_timer function (called when /proc/$PID/timers is read). This allows userspace applications to read arbitrary kernel memory
- /proc or cgroup leaks : Some old container runtimes, or misconfigured environments can lead to sensitive information exposure to containers, including /proc/*, system resource usage information, or the Docker API socket (leading to full control of the Docker engine)
Beyond security, performance interference is another critical consequence of using a shared kernel.
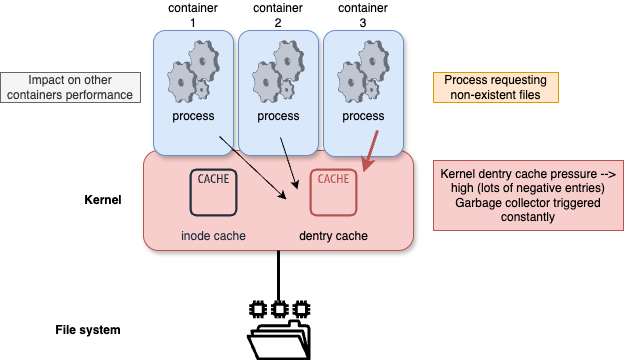
As a good example, let’s have a look at the inode and dentry caches used by the kernel : they store, respectively, inode entries (metadata about accessed files, such as filetype, ownership, permissions, timestamps, etc), and directory entries (dentry) (which map a filename / filepath to the associated inode), for faster retrieval when using the open() syscall for example. Those caches are managed by the Linux kernel slab allocator, find more info here.
Let’s say we have a given container trying to access, at high rate, to non-existent file.
This will cause negative dentry entries to be created on the kernel cache structure after the file system is queried, so that next access attempts will be immediately answered with an ENOENT exception (the famous “No such file or directory”).
The problem is that causing pressure on the kernel dentry cache causes more regular executions of the associated garbage collector (which is in charge of cleaning this cache when it becomes overloaded) : each cleaning causes an increase in the next attempt of accessing any file in the filesystem, which potentially impacts all other containers running within the same kernel.
With all this is mind, it is clearly understandable that while containers are a very good option for most of the use-cases we can see on enterprise platforms, that’s not true for multi-tenant environments.
While most of the issues we evoked are not all true anymore (including inode / dentry caches exhaustion, which have been fixed in cgroupv2), all of those examples proves that the slightest little problem in the cogs of the kernel can lead to big security or performances risks.
That’s where MicroVMs comes into play.
What is a MicroVM ?
A MicroVM is a (very) minimalist virtual machine designed to provide the security and strong isolation of VMs, while having an almost negligible startup time and providing the same resource efficiency as containers.
MicroVMs typically :
- boot a very small an minimal kernel and init process without any extra service
- have no BIOS / UEFI, no peripheral emulation nor unnecessary drivers (only a handful of devices are exposed, such as virtio-net or virtio-block, and the hypervisor is in charge of reserving the memory, loading the kernel code, and move the instruction pointer to the good address)
- are represented as user-space processes on the host, simplifying management and enforcing strict boundaries : each MicroVM runs its own kernel and does not share kernel structures with others, unlike containers.
This design makes MicroVMs particularly attractive for multi-tenant environments, FaaS (Function-as-a-Service) platforms like AWS Lambda, or any situation where workload density, startup time, and security are critical, together with high-scale needs.
How Firecracker powers MicroVMs ?
Firecracker is a lightweight VMM (Virtual Machine Monitor) purpose-built by AWS to launch and manage MicroVMs. It was designed from the ground up to meet the performance and isolation requirements of serverless workloads at massive scale.
Written in Rust, and providing minimal-devices exposure (virtio only), it is fully controllable with a REST API socket.
Moreover, and to strengthen the (already high) isolation safety, Firecracker uses a Jailer component which applies seccomp-bpf filters, cgroups, and chroot isolation (similar to the basic security functions used for Linux containers) to the VM process itself to further reduce the potential impact of a compromise.
Also, the guest kernel and root file system are immutable (the hypervisor makes sure that they are read-only), drastically reducing the risk of runtime tampering.
Firecracker is able to start MicroVMs dedicated to AWS Lambda usage in ~100ms, while being able to start thousands of them per second on any given host. The memory footprint of those MicroVMs can be as low as 5MB.
In terms of security, the paradigm and approach are completely different : while the previous Lambda design (fully based on containerization) was putting the host kernel at risk, allowing untrusted code calls to the host kernel directly (eventually reducing the surface area by using seccomp-bpf), now the Lambda code has full access to the guest microVM kernel (almost all syscalls are permitted), allowing all kernel features to be used, but explicitly treating the guest kernel itself as untrusted. Hardware virtualization and the VMM fully isolates the guest kernel’s access to the privileged domain and the host system (hypervisor) kernel.
Want to give it a try ? Here’s how to start your first Firecracker MicroVM and make it execute a Lambda-like workload
Most of the information you need is on the official Getting Started Guide, but let’s have a look together.
First, make sure KVM is supported (and installed) on your host machine :
sudo apt-get install -y cpu-checker squashfs-tools
sudo kvm-ok
  INFO: /dev/kvm exists
  KVM acceleration can be used
Then download and extract the latest Firecracker binary from the source repo, as well as the latest Linux kernel / Ubuntu rootfs from Amazon :
sudo su
cd /opt
mkdir firecracker
cd firecracker

# Download the latest Firecracker release
ARCH="$(uname -m)"
release_url="https://github.com/firecracker-microvm/firecracker/releases"
latest_version=$(basename $(curl -fsSLI -o /dev/null -w  %{url_effective} ${release_url}/latest))
CI_VERSION=${latest_version%.*}
curl -L ${release_url}/download/${latest_version}/firecracker-${latest_version}-${ARCH}.tgz | tar -xz
mv release-${latest_version}-$(uname -m)/firecracker-${latest_version}-$(uname -m) firecracker

# Get the latest Linux kernel
latest_kernel_key=$(curl "http://spec.ccfc.min.s3.amazonaws.com/?prefix=firecracker-ci/$CI_VERSION/$ARCH/vmlinux-&list-type=2" \
    | grep -oP "(?<=<Key>)(firecracker-ci/$CI_VERSION/$ARCH/vmlinux-[0-9]+\.[0-9]+\.[0-9]{1,3})(?=</Key>)" \
    | sort -V | tail -1)

wget "https://s3.amazonaws.com/spec.ccfc.min/${latest_kernel_key}"

# And get the latest Ubuntu RootFS
latest_ubuntu_key=$(curl "http://spec.ccfc.min.s3.amazonaws.com/?prefix=firecracker-ci/$CI_VERSION/$ARCH/ubuntu-&list-type=2" \
    | grep -oP "(?<=<Key>)(firecracker-ci/$CI_VERSION/$ARCH/ubuntu-[0-9]+\.[0-9]+\.squashfs)(?=</Key>)" \
    | sort -V | tail -1)
ubuntu_version=$(basename $latest_ubuntu_key .squashfs | grep -oE '[0-9]+\.[0-9]+')

wget -O ubuntu-$ubuntu_version.squashfs.upstream "https://s3.amazonaws.com/spec.ccfc.min/$latest_ubuntu_key"
Create an SSH key-pair and inject the public key into the filesystem for further SSH connection to the MicroVM
# Create an ssh key for the rootfs
unsquashfs ubuntu-$ubuntu_version.squashfs.upstream
ssh-keygen -f id_rsa -N ""
cp -v id_rsa.pub squashfs-root/root/.ssh/authorized_keys
mv -v id_rsa ./ubuntu-$ubuntu_version.id_rsa
# create ext4 filesystem image
sudo chown -R root:root squashfs-root
truncate -s 400M ubuntu-$ubuntu_version.ext4
sudo mkfs.ext4 -d squashfs-root -F ubuntu-$ubuntu_version.ext4
Verify that everything was created properly and extract the proper variable names and values for the next steps (it will directly give you the export commands to copy-paste) :
KERNEL_BIN="$(ls -d $PWD/vmlinux* | tail -1)"
ROOT_FS="$(ls -d $PWD/*.ext4 | tail -1)"
SSH_KEY="$(ls -d $PWD/*.id_rsa | tail -1)"
echo "export KERNEL_BIN=$KERNEL_BIN"
echo "export ROOT_FS=$ROOT_FS"
echo "export SSH_KEY=$SSH_KEY"
The output should look like this, keep it carefully :
export KERNEL_BIN=/opt/firecracker/vmlinux-6.1.128
export ROOT_FS=/opt/firecracker/ubuntu-24.04.ext4
export SSH_KEY=/opt/firecracker/ubuntu-24.04.id_rsa
Let’s try to start our MicroVM. You need to start the firecracker process on a first shell :
./firecracker --api-sock /tmp/firecracker.socketThen, on a second shell, send all the necessary API calls to the Firecracker socket to configure and start the MicroVM (paste the “export” commands obtained before after using this) :
sudo su
cd /opt/firecracker
# Prepare a logging file
LOGFILE="$(pwd)/firecracker.log"
touch $LOGFILE
# Send an API call to the Firecracker process to apply the kernel configuration
KERNEL_BOOT_ARGS="console=ttyS0 reboot=k panic=1 pci=off"
curl --unix-socket /tmp/firecracker.socket \
-i -X PUT "http://localhost/boot-source" \
-H "Accept: application/json" \
-H "Content-Type: application/json" \
--data "{
\"kernel_image_path\": \"${KERNEL_BIN}\",
\"boot_args\": \"${KERNEL_BOOT_ARGS}\"
}"
# Send an API call to the Firecracker process to use this logging file
curl --unix-socket /tmp/firecracker.socket \
-i -X PUT "http://localhost/logger" \
-H "Accept: application/json" \
-H "Content-Type: application/json" \
--data "{
\"log_path\": \"${LOGFILE}\",
\"level\": \"Debug\",
\"show_level\": true,
\"show_log_origin\": true
}"
# Send an API call to the Firecracker process to mount the root filesystem
curl --unix-socket /tmp/firecracker.socket \
-i -X PUT "http://localhost/drives/rootfs" \
-H "Accept: application/json" \
-H "Content-Type: application/json" \
--data "{
\"drive_id\": \"rootfs\",
\"path_on_host\": \"${ROOT_FS}\",
\"is_root_device\": true,
\"is_read_only\": false
}"
# Send an API call to the Firecracker process to start the instance
curl --unix-socket /tmp/firecracker.socket -i \
-X PUT "http://localhost/actions" \
-H "Accept: application/json" \
-H "Content-Type: application/json" \
--data "{
\"action_type\": \"InstanceStart\"
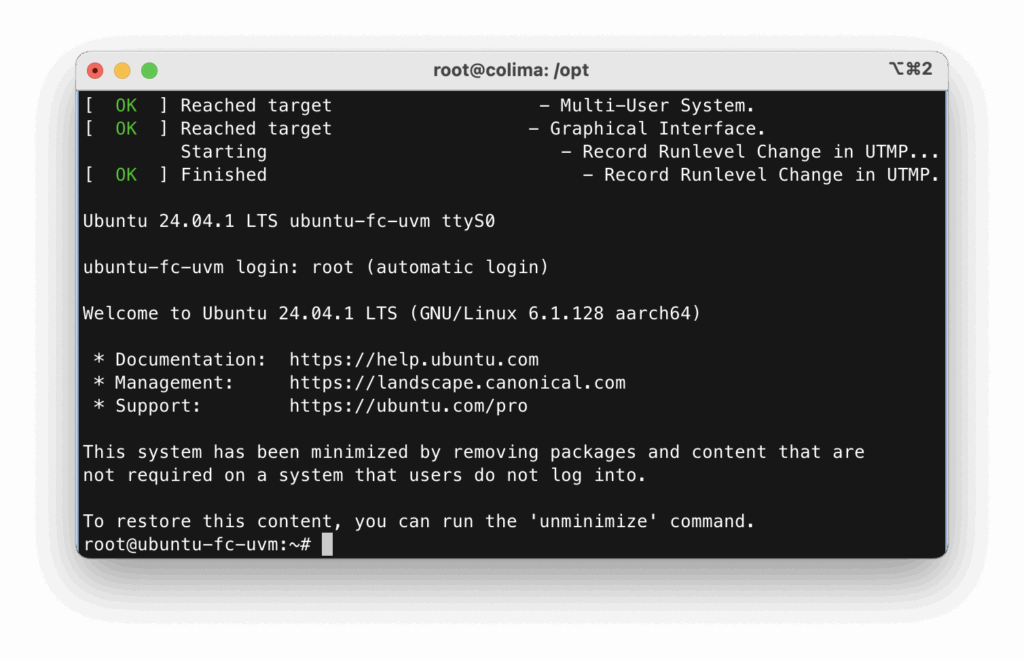
}"You should see the instance starting on the firecracker shell (booted in ~3 seconds on my host machine) :
Note that the VM configuration / startup could also have been done using a JSON configuration file. Check the following one, that you can start using the firecracker binary command below, instead than using API mode.
{
  "boot-source": {
    "kernel_image_path": "vmlinux-6.1.128",
    "boot_args": "console=ttyS0 reboot=k panic=1 pci=off",
    "initrd_path": null
  },
  "drives": [
    {
      "drive_id": "rootfs",
      "partuuid": null,
      "is_root_device": true,
      "cache_type": "Unsafe",
      "is_read_only": false,
      "path_on_host": "ubuntu-24.04.ext4",
      "io_engine": "Sync",
      "rate_limiter": null,
      "socket": null
    }
  ],
  "machine-config": {
    "vcpu_count": 1,
    "mem_size_mib": 1024,
    "smt": false,
    "track_dirty_pages": false,
    "huge_pages": "None"
  },
  "cpu-config": null,
  "balloon": null,
  "network-interfaces": [],
  "vsock": null,
  "logger": {
        "log_path": "firecracker.log",
        "level": "debug",
        "show_level": false,
        "show_log_origin": false
  },
  "metrics": null,
  "mmds-config": null,
  "entropy": null
}
./firecracker --no-api --config-file json_test.json Let’s stop the MicroVM to make some fun changes.
Note that the “standard” way to stop the MicroVM on Firecracker is to use the “reboot” command into the VM.
Update to the MicroVM : Python Lambda runtime
Let’s change a bit our MicroVM rootFS so that :
- we can mount a secondary filesystem containing a Python code / requests handler
- we add a network interface to the MicroVM and assign it an IP address
- the MicroVM immediately starts a Python process, with a script which is on the secondary file system, which starts an HTTP server (using the http.server module), and the provided Python code as a request handler
First, we have to create the sh script which will start the Python process. Save it as “start_server.sh” (let’s continue working on the /opt/firecracker directory, we don’t really care as we are on a lab). You can do that on the first console, as the firecracker process has stopped as soon as the VM halted :
#!/bin/sh
### BEGIN INIT INFO
# Required-Start: 	$all
# Default-Start: 	2 3 4 5
# Default-Stop: 	0 1 6
### END INIT INFO

echo "Starting minimal Python web server..."

# Mount the lambda code from /dev/vdb
mkdir -p /mnt/lambda
mount /dev/vdb /mnt/lambda

# Launch the Python web server (adapt port and logic as needed)
cd /mnt/lambda
python3.12 server.py
Then, mount the MicroVM rootFS, copy the sh script on it, and use update-rc (after chroot) to make sure it’s triggered at startup :
mkdir temp_rootfs_mount
mount $ROOT_FS temp_rootfs_mount
mv start_server.sh temp_rootfs_mount/etc/init.d/
chmod +x temp_rootfs_mount/etc/init.d/start_server.sh
chroot temp_rootfs_mount
update-rc.d start_server.sh defaults
exit
umount temp_rootfs_mount
Now let’s create a new filesystem which will contain our server.py main file (starting the webserver), and our lambda handler file (which will simply display a simple Hello message) :
dd if=/dev/zero of=lambda.ext4 bs=1M count=10
mkfs.ext4 lambda.ext4
mkdir lambda_mount
sudo mount lambda.ext4 lambda_mount
cd lambda_mount
Save the code below as “server.py” on the current folder. This code is in charge of running a minimal web server (using the http.server Python module), exposed on port 8080, and load the Lambda function code (that we’ll create right after) to handle requests.
from http.server import BaseHTTPRequestHandler, HTTPServer
import importlib.util
import os

class Handler(BaseHTTPRequestHandler):
    def do_GET(self):
        try:
            # Dynamically import lambda.py
            spec = importlib.util.spec_from_file_location("lambda_code", "lambda.py")
            module = importlib.util.module_from_spec(spec)
            spec.loader.exec_module(module)

            # Call the 'handler' function
            response = module.handler(self.path)
            self.send_response(200)
            self.end_headers()
            self.wfile.write(response.encode())

        except Exception as e:
            self.send_response(500)
            self.end_headers()
            self.wfile.write(str(e).encode())

if __name__ == '__main__':
    HTTPServer(('0.0.0.0', 8080), Handler).serve_forever()
Then save the code below as “lambda.py” (which is our basic Lambda function code) :
def handler(path):
    return f"Hello from Lambda! You requested {path}\n"
Then finally unmount the lambda filesystem :
cd ..
umount lambda_mount
Restart the Firecrack process as we already did for our first example above, but send the following API calls to it before starting the instance (you might have to delete the unix socket at /tmp/firecracker.socket before being able to restart it)
rm /tmp/firecracker.socket
./firecracker --api-sock /tmp/firecracker.socket
Now back to the second console, create a TAP interface on the host so that we can connect the microVM interface with a bridge, and reach the web server running on it :
TAP_DEV="tap0"
TAP_IP="172.16.0.1"
MASK_SHORT="/30"
FC_MAC="06:00:AC:10:00:02"

# Setup network interface
sudo ip link del "$TAP_DEV" 2> /dev/null || true
sudo ip tuntap add dev "$TAP_DEV" mode tap
sudo ip addr add "${TAP_IP}${MASK_SHORT}" dev "$TAP_DEV"
sudo ip link set dev "$TAP_DEV" up

# Enable ip forwarding
sudo sh -c "echo 1 > /proc/sys/net/ipv4/ip_forward"
sudo iptables -P FORWARD ACCEPT
:
# This first request creates a network interface card on the guest MicroVM and maps it with the host tap interface
curl --unix-socket /tmp/firecracker.socket -i \
    -X PUT "http://localhost/network-interfaces/net1" \
    -H "Accept: application/json" \
    -H "Content-Type: application/json" \
    --data "{
        \"iface_id\": \"net1\",
        \"guest_mac\": \"$FC_MAC\",
        \"host_dev_name\": \"$TAP_DEV\"
    }"

# And this one mounts the lambda filesystem so that the code on it can be ran at startup
curl --unix-socket /tmp/firecracker.socket -i \
    -X PUT "http://localhost/drives/lambda" \
    -H "Accept: application/json" \
    -H "Content-Type: application/json" \
    --data "{
        \"drive_id\": \"lambda\",
        \"path_on_host\": \"lambda.ext4\",
        \"is_root_device\": false,
        \"is_read_only\": true
    }"
Start the MicroVM with the “InstanceStart” action call we used above, and let’s try to reach it on port 8080 from the host :
root@colima:/opt# curl http://172.16.0.2:8080/test-lambda
Hello from Lambda! You requested /test-lambda
root@colima:/opt#
Here’s our MicroVM running a web server with the Python http.server module, with our Lambda function code as the handler !
(This is not exactly the way AWS makes it run, but if you want to deep-dive on this, take a look at this white paper).
How AWS manages micro-VMs for Lambda workloads
AWS doesn’t triggers a new microVM creation for every Lambda invocation : that would, in average, highly increase the Lambda execution time. Instead, Lambda uses a pool of Firecracker microVMs that are dynamically created, warmed up, and re-used when possible.
A given microVM is only reused for the same customer, and even more, for the same Lambda function.
Cold start : if there’s no existing microVM matching the Lambda runtime and configuration, AWS boots a new Firecracker microVM, loading the minimal kernel and runtime (ie : Python 3.12), and attaches the Lambda package as a filesystem.
Warm start : if a microVM for the invoked Lambda is already started, AWS can reuse it. This is why warm starts are much faster : the microVM is already running, and most of the time, even the runtime and code are still in memory
Networking : when a Lambda function is configured to run inside a VPC, AWS attaches an Elastic Network Interface (ENI) to the microVM. This is done through the AWS Nitro System, which exposed a virtual NIC inside the microVM via virtio-net.
In some cases, multiple Lambda functions in the same VPN and using the same Security Group can reuse the same ENI. See my blog post about re:Invent which contains interesting links to Nitro system documentations and resources.
Storage : each Lambda microVM gets a small ephemeral /tmp file system inside the VM (up to 512 MB), and a read-only block device containing the Lambda code package. Optionally, other block devices can be exposed for Lambda layers or extensions. BTW, the /tmp filesystem can be used if you want to do some labs demonstrating the microVM / execution environment reuse among several invocations of the same function.
More recently, AWS also introduced Lambda SnapStart, which is no more than a microVM snapshot, which permits to reduce cold-start times by immediately restarting an initialized (and warmed up) microVM with its Lambda runtime.
See below a new view of how AWS runs Lambda functions with Firecracker microVMs, compared to the previous architecture we saw at the beginning :

Conclusion
AWS Lambda functions revolutionized the way we think about deploying and scaling applications and workloads, and Firecracker microVMs then became the silent engine powering that transformation.
By adding the strong isolation of virtual machines to the speed and efficiency of linux containers features, Firecracker allows Lambda to securely run thousands of functions per host while guaranteeing performance and security for every customer.
This type of virtual machines not only reduced the attack surface and “noisy neighbor” impacts by giving each runtime its own kernel, but also permits AWS to fine-tune cold start times and resources usage, pushing serverless functions closer to “instant-on” execution.
While Lambda is the most famous example, microVM technology can have multiple usages well beyond multi-tenant SaaS platforms : CI/CD sandboxing, ephemeral development environments, etc.
I highly encourage you to have a look at it, and start your first VMs with Firecracker (or any microVM hypervisor alternative).
As the ecosystem around Firecracker grows, expect to see microVMs become a foundational building block for all high-performance and secure services.
Links
https://github.com/firecracker-microvm/firecracker